MI Y2 edl point methods boot in EDL mode
As you know on Xiaomi Redmi Y2 you will not be able to enter edl mode neither using edl USB cable nor using EDL commands or options. So the question is how can you enter or boot Xiaomi Redmi Y2 in edl mode? And you are in the right place to know and understand the complete procedure to use edl mode on Xiaomi Redmi Y2. To use EDL mode on this model, you just need to identify the EDL test point on the phone’s motherboard, if you find the correct test point, just connect these 2 points and that’s it, and the phone will now have your computer detected. Now you can easily flash the firmware on your Mi phone and also delete the Mi account from the phone.
Table of Contents
This way to Boot into EDL Mode on Redmi Y2 Using edl point
If your phone is Qualcomm processor then your phone will definitely support EDL mode or emergency download mode, however not all Qualcomm based devices support it. However, today, Mediatek processor phones are also being used to unlock bootloader.
Redmi Y2 is a very good smartphone of the Xiaomi brand, it runs a lot due to the quality of the camera and battery, the Redmi Y2 comes with a Qualcomm processor, due to which it has become strong to take it in aadal mode.
There can be many reasons behind switching to Redmi Y2 edl point, if you want to flash stock rom for your phone or want to unlock your phone, you will need edl mode. If you want to install or update your own Redmi Y2 phone, you have several options to update the new stock rom on your device using recovery mode or fastboot mode.
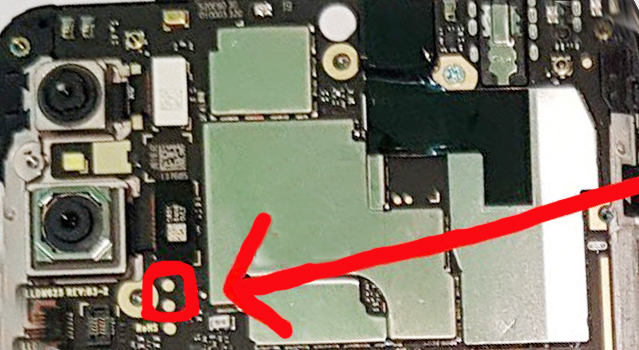
Redmi Y2 Edl Point Image

Redmi Y2 test point image and follow this step to connect Redmi Y2 in Edl mode.
How to connect Redmi Y2 in Edl mode
- Open the first back cover of Redmi Y2 (be careful when removing the back cover of the device)
- Remove the battery cable (battery is not required for EDL mode)
- Now use tweezers to shorten the 2nd red dot as shown in the image above.
- Now connect the USB cable to your device.
- Your phone has now successfully entered EDL mode, now you can see the Qualcomm HS USB QDLer 9008 port on your computer.
Importent Note:
This tutorial is for informational and educational purposes only.
This process has been tested and is 100% accurate, but we do not assume any responsibility or any damage caused by this process. So do it at your own risk.
By doing this procedure you may void the warranty of your phone. If you have any query regarding this topic, feel free to ask us in the comment box. We are here to give you the best answers to all your questions.